Categories
Tags
Archives
RSVSR How to Prepare for Arc Raiders Toxic Swamp Event
-
Water Troubles is the kind of objective that sounds quick, then turns into a 20‑minute jog while you second-guess every concrete corner. I went in thinking I'd just tag a tunnel and grab a vial, and instead I spent half the run chasing the wrong "pipe-looking" openings. If you're stocking up or planning your kit around the trip, it's worth knowing where you're headed—and what you can safely ignore—especially if you've been saving your ARC Raiders Coins for something better than a panic re-buy after a bad raid.
Getting your bearings at the dam
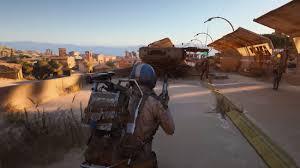
You want the eastern side of Dam Battlegrounds, aimed toward Red Lakes. The easiest mental checkpoint is Red Lake Balcony. From up there, look down at the dam face and don't overthink it: the Flood Access Tunnel isn't a neat little door, it's a huge round pipe mouth set into the wall. It sits below the balcony line and to the right of the Control Tower POI. If you're looking at the tower and drifting left, you've gone the wrong way. When you get close, the quest tracker usually pings and that's your "OK, I'm not losing it" moment.
Dropping down without getting farmed
There are a couple ways to reach it, and none are totally safe. You can take ladders and ziplines down from the balcony, or you can loop around and cross the basin floor. The basin route feels calmer until you realise you're a moving dot in a wide-open kill lane. I stick tight to the dam wall once I'm down there—less silhouette, more cover, fewer angles to watch. Follow that wall and the pipe entrance will basically pull you in. Just don't stop in the open to check your map; that's when patrols (or opportunistic players) decide you look like free loot.
Finding the intake and grabbing the sample
Inside, it narrows into a straightforward drainage run. Keep moving. You'll spill into a larger chamber with shallow, dirty water and industrial plumbing everywhere. This is where people waste time, because everything looks interactable. It isn't. Head to the left side of the pool and look for the intake pipe; when you're close enough, you'll get the "Sample Water" prompt. Hit it and you're done with the important bit. The sneaky upside: you don't have to extract with the sample for credit. The moment you take it, the objective completes, so if you get jumped on the way out, it still counts.
Loadout and exit mindset
Because the quest wants the tunnel, intake, and sample in one raid, treat the run like a delivery job, not a victory lap. Go light, bring what you can afford to lose, and leave the "I'll just loot one more crate" habit at spawn. If you do want to cash in on progress quickly between raids, plenty of players use RSVSR to pick up game currency and items so they can re-gear fast and get right back to knocking out tasks instead of grinding from zero.