Categories
Tags
-
#essay
#AA1253-001 Latest Air Jordan XXX2 MJ Day 2017
#dubai
#casino
#betting
#apps
#2017 An Oscar for Best Actor or Actress is the highest honor every performer in Hollywood aspires to achieve. Other awards hardly measure up to the worth.
#Agen Joker188
#automotive
#CMD368
#Step-by-Step Guide
#Fildena Xxx review
#Fildena XXX
#callboyxxx
#spy app
#How to Find Love
#Hexagon Purus
#Adobe Flash Player
#pin up
#1win
#ххх
#XXX
#хххх
#vvvvvvvvvvvvvvvvvvvvvvvvvv
#Ultimate Guide
#MIỄN VISA:
#1 win
#RocketPlay
#jbl speakers online
#Cyprus Offshore Company
#Car NFT Game
#QIC
#Crazy Time
#BK
#Softermii
#Fan Gear Nation
#Sensational Moments
#Bacho
#ааааааааааа
#fraud sms
#[[[[
#Platforms for Ecommerce
#picture
#DoCast:
#OzEssay
#unique casino gratis
#Pin Up Kasino
#Digiscorp Software Development Company
#WhatsApp PLUS: A Detailed Guide to the Enhanced Messaging Experience
#Lope-Bet.in
#NL
#Role of Adult Film
#Microchannel
#Aspect-Plus.com
#Supporting Community Growth
#TV with Ease:
#Bridging the Healthcare Gap
#Local County Screenings
#Drupal
#Elegant and Durable:
#Online Bank
#Medical Essay
#Why 1King Casino
#Spin into Action
#Yesoft Store:
#Experience the Thrill
#Выставк
#Delete for Your
#Templifica
#Günstig
#Site Preparation
#How River API
#What Makes Royal Reels So Popular
#Webinar Tools Support
#Why Platforms Such as lemo
#Des portefeuilles électroniques
Archives
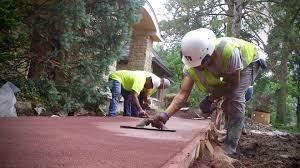
A Contractor’s Guide to Effective Concrete Site Preparation
-
When I first got into construction, I thought pouring concrete was the hardest part of the job. But years of experience quickly taught me that the real challenge—the make-or-break stage of any project—happens before the first truck ever shows up with the mix. Concrete site preparation doesn’t just set the stage; it determines whether that slab will last decades or start failing within months.
For contractors, mastering site prep isn’t optional. It’s the difference between earning repeat clients and fielding endless callbacks. This guide breaks down the key steps, common mistakes, and professional insights every contractor should know about effective site preparation.
Why Site Preparation Matters More Than You Think
Concrete looks strong, but it’s surprisingly vulnerable when the ground beneath it isn’t ready. Improper preparation leads to uneven settling, drainage issues, premature cracking, and costly repairs.
Think of it this way: concrete doesn’t bend—it breaks. If the soil shifts, if water pools, if the base isn’t compacted right, you won’t see the issues immediately, but they’ll show up eventually. And when they do, the client will be calling you back—not the soil.
For contractors, that means your reputation is tied directly to how well you prepare the site.
Core Steps of Concrete Site Preparation
While projects differ in size and scope, the fundamentals don’t change. Here’s how a contractor should approach prep work from start to finish.
1. Site Clearing
Remove vegetation, roots, debris, and topsoil. Organic material left under the slab eventually decomposes, leaving voids that can destabilize the concrete.
2. Excavation and Grading
Cut the ground to the proper depth, ensuring slopes allow for water runoff. Even a slight grading mistake can create drainage problems that compromise the slab’s durability.
3. Base Material Placement
Spread and compact a stable base layer—usually gravel or crushed stone. The material you choose depends on soil conditions, climate, and load requirements. The goal is simple: provide a strong, even foundation that won’t shift.
4. Compaction and Testing
Proper compaction is one of the most overlooked steps. If the soil or base isn’t compacted correctly, the slab will settle unevenly. Good contractors use plate compactors, rollers, or tampers depending on the site, and often test density before moving forward.
5. Formwork and Reinforcement
Wood or metal forms define the slab’s boundaries and shape, while rebar or mesh provides structural reinforcement. Misaligned forms or poorly placed rebar can create weak points long before the concrete cures.
6. Drainage Considerations
Water is concrete’s worst enemy. Planning for drainage—whether through sloping, installing French drains, or using vapor barriers—protects the slab from erosion and freeze-thaw cycles.
Common Mistakes Contractors Should Avoid
I’ve seen some of these mistakes firsthand, and they always cost more to fix later than to prevent upfront.
Rushing the grading process – Even small errors here compound over time.
Skipping soil testing – Not every soil type can support concrete the same way. Clay-heavy soils, for example, need special handling.
Under-compaction – “Good enough” compaction isn’t good enough. Voids and soft spots show up months later as cracks.
Poor communication with the client – Failing to explain why extra steps (like drainage work) are necessary can lead to pushback and corner-cutting.
Why Contractors Benefit from Getting It Right
From a business standpoint, strong site prep practices do more than keep clients happy—they protect your bottom line. Callbacks, repairs, and warranty claims eat into profits and take crews away from new work. On the flip side, projects built on solid preparation tend to generate referrals and long-term relationships.
I’ve built a reputation around never cutting corners during prep, and it’s paid dividends in client trust. That’s something every contractor should prioritize.
Helpful Resources for Contractors
If you’re serious about leveling up your prep work, it’s worth checking out detailed resources like https://www.siteprep.com/concrete-site-preparation/, which walks through techniques and best practices with a contractor’s perspective in mind.
Pro Tips from the Field
Here are a few lessons I’ve picked up over the years:
Plan for the unexpected. Always budget extra time for weather delays. Wet soil compacts differently, and rushing can compromise the base.
Invest in good equipment. Cheap compactors or poorly maintained graders end up costing you more.
Educate your clients. Walk them through the prep process so they understand why it matters. Clients are less likely to argue about costs when they see the long-term value.
Document everything. Photos of compaction, base layers, and formwork protect you if questions come up later.
Concrete site preparation isn’t glamorous. Most clients won’t even see the work you put into it. But as a contractor, you’ll feel the effects—either in the form of callbacks and failures or in repeat business and long-lasting results.
Do it right, and you’ll rarely hear from your client again—except when they’re calling you for their next project.